How to Deploy MariaDB 11.0.2 in Docker Swarm Behind Traefik v2.0
MariaDB turns data into structured information in a wide array of applications. Learn how to deploy this enhanced, drop-in replacement for MySQL in a Docker Swarm cluster.

MariaDB turns data into structured information across a wide array of applications, ranging from banking systems to enterprise websites. It is an enhanced, highly performant, drop-in replacement for MySQL.
In this post, I am going to show you how to deploy MariaDB in a Docker Swarm Cluster using Docker Compose. This deployment will act as the foundational database server for all the applications we will deploy later behind our Traefik edge router.
MariaDB is fast, scalable, and robust. Its rich ecosystem of storage engines, plugins, and tools makes it incredibly versatile for a wide variety of use cases.
Prerequisites
Please ensure you fulfill the following requirements before proceeding with the deployment:
- A Docker Swarm Cluster configured with GlusterFS for persistent storage.
- Traefik v2.0 deployed as the ingress reverse proxy to expose microservices externally.
Introduction to MariaDB
MariaDB is one of the most popular database servers in the world. It is a fork of MySQL, created by the original developers of MySQL after its acquisition.
MariaDB is guaranteed to stay open source forever. Notable users include Wikipedia, WordPress.com, and Google.
Developed as open-source software, MariaDB provides a robust SQL interface for accessing data and features modern capabilities, including GIS and JSON support.
You can read more about MariaDB here.
Managing Docker Container Data
By default, all data written to the file system inside a container is ephemeral. If the container is terminated or rescheduled, the data is lost. Web servers and proxies do not store data directly; they rely on a backend database server for secure, reliable information storage.
To overcome this ephemeral behavior and ensure our database survives restarts, I am using GlusterFS.
I previously set up a Replicated GlusterFS Volume to ensure data is mirrored across the cluster.
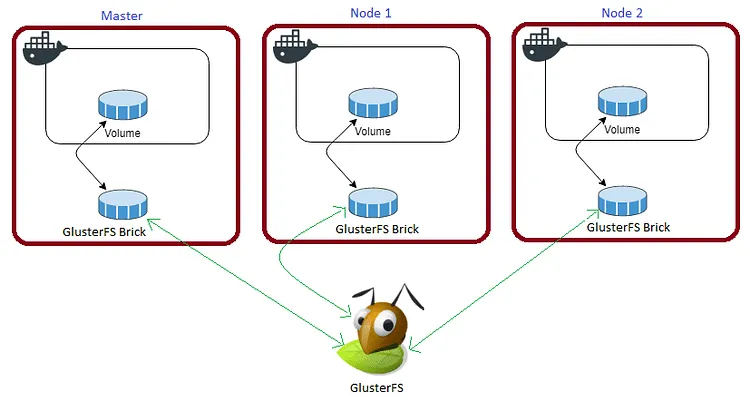
The volume is mounted on all nodes. When a file is written to the
/mntpartition, the data is replicated to all other nodes in the cluster.
If one node fails, Docker Swarm automatically restarts the container on another node without losing any data. This is the beauty of a replicated volume.
For disaster recovery, we need to persist the /var/lib/mysql directory inside the MariaDB container.
Create a persistent folder in the /mnt directory:
cd /mnt
sudo mkdir -p mariadata
Watch the video below for a complete guide on setting up a GlusterFS Replicated Volume.
Securing the MariaDB Environment
MariaDB Docker images offer various ways to set the MySQL root password, but some methods are far more secure than others:
- Environment Variables: Specifying
MYSQL_ROOT_PASSWORDdirectly in the compose file. (Least secure) - Mounted Files: Mounting a plain-text password file into the container. (Better, but still exposed on the host)
- Random Generation: Specifying
MYSQL_RANDOM_ROOT_PASSWORDto have MariaDB generate and print a random password to the logs. (Recommended) - Docker Secrets: Securely storing credentials in an encrypted Raft log, which is then securely replicated to other nodes. (Highly Recommended)
We will use the Docker Secrets method to pass the required password values to our MariaDB container.
Docker introduced Docker Secrets in version 1.13 to manage sensitive data. You can read the overview here. Setting up containers with secrets in Docker Compose is straightforward and keeps passwords out of your source code.
MariaDB Custom Configuration (Optional)
The primary startup configuration is located at /etc/mysql/my.cnf. This file also includes any .cnf files found in the /etc/mysql/conf.d directory.
If you want to use a customized MySQL configuration, you can create a custom config file on the host and mount its directory into the container:
version: "3.7"
services:
  mariadb:
    image: mariadb:11.0.2
    volumes:
      - /my/custom/config:/etc/mysql/conf.d
Alternatively, many configuration options can be passed directly as flags to mysqld via the command key. For example, to change the default encoding to utf8mb4 and adjust timeout settings:
version: "3.7"
services:
  mariadb:
    image: mariadb:11.0.2
    command: ["mariadb", "--character-set-server=utf8mb4", "--collation-server=utf8mb4_unicode_ci", "--wait_timeout=28800", "--interactive_timeout=28800", "--max_allowed_packet=256M"]
Prepare the MariaDB Environment
First, let’s create the password files that Docker Secrets will use.
cd /opt
sudo mkdir -p maria
cd maria
sudo nano wp_db_password.txt
(Enter your desired database password, save, and exit).
sudo nano mysql_root_password.txt(Enter your desired root password, save, and exit).
Next, create an internal Docker overlay network named private. We will use this to bind MariaDB to Application Containers without exposing the database to the outside world.
docker network create -d overlay privateMariaDB Docker Compose Configuration
Create the Docker Compose file:
sudo touch maria.yml
sudo nano maria.yml
Paste the following stack configuration:
version: "3.7"

services:
  mariadb:
    image: mariadb:11.0.2
    volumes:
      - /mnt/mariadata:/var/lib/mysql
    secrets:
      - wp_db_password
      - mysql_root_password
    environment:
      - MYSQL_USER=testuser
      - MYSQL_DATABASE=testdb
      - MYSQL_PASSWORD_FILE=/run/secrets/wp_db_password
      - MYSQL_ROOT_PASSWORD_FILE=/run/secrets/mysql_root_password
    networks:
      - proxy
      - private
    deploy:
      placement:
        constraints: [node.role == manager]
      replicas: 1
      update_config:
        parallelism: 2
        delay: 10s
      restart_policy:
        condition: on-failure
      labels:
        - "traefik.enable=false"

secrets:
  wp_db_password:
    file: ./wp_db_password.txt
  mysql_root_password:
    file: ./mysql_root_password.txt

volumes:
  mariadata:
    driver: "local"

networks:
  proxy:
    external: true
  private:
    external: true
Watch the video below to see a walkthrough of deploying MariaDB in a Docker Swarm Cluster.
Understanding the deploy Key
In Docker Swarm, the deploy key specifies configurations related to scaling, updates, and placement. It is ignored by standard docker-compose up commands but is heavily utilized by docker stack deploy.
mode: Can beglobal(exactly one container per Swarm node) orreplicated(a specified number of containers). The default isreplicated.replicas: The number of containers that should run concurrently.placement: Defines constraints. For databases, it is often best to pin the workload to manager nodes or specific storage nodes usingnode.role == manager.update_config: Controls rolling updates (parallelismanddelay).restart_policy: Configures how containers behave when they crash (condition: on-failure).labels: When placed underdeploy, these labels communicate with tools like Traefik. By setting"traefik.enable=false", we ensure our database is strictly internal and not exposed to the public internet.
Deploy MariaDB using Docker Compose
Deploy the stack to your Swarm using the following command:
docker stack deploy --compose-file maria.yml mariaCheck the status of the stack deployment:
docker stack ps mariaCreate and Manage Databases
Let’s log into the running MariaDB container to verify the setup and manage our databases.
Run docker ps on your manager node to list the running containers and find the CONTAINER ID of your MariaDB task.
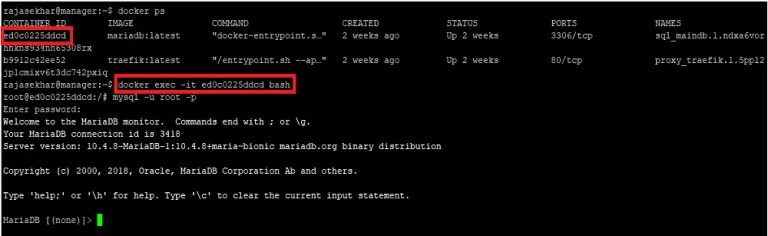
Log into the container’s interactive shell using that ID:
docker exec -it <CONTAINER_ID> bashOnce inside, log into the MariaDB admin console using the root password you created earlier:
mysql -u root -pType SHOW DATABASES; to list all databases. You should see the default testdb that was created automatically via the compose environment variables.
You can create new databases for future applications manually:
CREATE DATABASE new_app_db;And delete them if necessary:
DROP DATABASE new_app_db;If you are not comfortable managing your database via the command-line console, I will be posting an upcoming article on how to deploy Adminer—a lightweight, web-based database management GUI that serves as an excellent alternative to phpMyAdmin.
Stay tuned for Adminer! 🙂

Continue reading

How to Deploy MariaDB 11.2.2 Using Docker Compose Behind Caddy v2.7.6
MariaDB turns data into structured information in a wide array of applications, ranging from banking to websites. It is an enhanced, drop-in replacement for MySQL.

How to Deploy MongoDB 4.4.22 in Docker Swarm Behind Traefik v2.0
MongoDB is a highly scalable NoSQL database program that uses JSON-like documents. Learn how to deploy it as a highly available service in Docker Swarm.
How to Deploy Adminer 4.8.1 Database Management Tool in Docker Swarm Behind Traefik v2.0
Adminer is a lightweight database management tool with a clean GUI, serving as a powerful alternative to phpMyAdmin and CLI administration.