How to Deploy MongoDB 4.4.22 in Docker Swarm Behind Traefik v2.0
MongoDB is a highly scalable NoSQL database program that uses JSON-like documents. Learn how to deploy it as a highly available service in Docker Swarm.

MongoDB is a NoSQL database program that utilizes JSON-like documents with optional schemas. Developed by MongoDB Inc, it is licensed under the Server Side Public License (SSPL).
MongoDB provides the scalability and flexibility you want alongside the querying and indexing capabilities you need.
In this post, I am going to show you how to deploy MongoDB 4.4.22 in a Docker Swarm Cluster using Docker Compose.
Many modern applications—such as Rocket.Chat (free, open-source enterprise team chat) and Wekan (open-source Kanban)—rely on MongoDB. Furthermore, setting up a MongoDB Replica Set is highly recommended to improve performance for applications like Rocket.Chat via Meteor Oplog tailing.
Prerequisites
Please ensure you fulfill the following requirements before proceeding with the deployment:
- A Docker Swarm Cluster configured with GlusterFS for persistent storage.
- Traefik v2.0 deployed as the ingress reverse proxy to expose microservices externally.
Introduction to MongoDB
MongoDB is a document database designed for ease of development and scaling.
It is a distributed database at its core, so high availability, horizontal scaling, and geographic distribution are built in and easy to use.
If you want to learn more about MongoDB, you can visit the official page and Wikipedia.
Core Features
- Flexible Data Model: Stores data in flexible, JSON-like documents, meaning fields can vary from document to document and data structures can be changed over time.
- Native Code Mapping: The document model maps naturally to objects in your application code, making data easy to work with.
- Powerful Analytics: Ad hoc queries, indexing, and real-time aggregation provide robust ways to access and analyze your data.
- Distributed by Default: Designed with high availability and horizontal scaling in mind.
- Open Availability: Free to use under the Server Side Public License (SSPL) v1.
MongoDB is widely adopted by organizations such as the City of Chicago, Codecademy, Google, Foursquare, IBM, Uber, Coinbase, Sega, Barclays, HSBC, eBay, Cisco, Bosch, and Urban Outfitters.
Configuring MongoDB via Docker
The startup configuration is specified in the /etc/mongo/mongod.conf file. If you want to use a customized MongoDB configuration, you can create your alternative configuration file in a directory on the host machine and then mount that directory location inside the MongoDB container.
For instance, if /my/custom/mongod.conf is the path to your custom configuration file on the host, you can start your container by mounting the directory:
version: "3.7"

services:
  mongo:
    image: mongo:4.4.22
    volumes:
      - /my/custom:/etc/mongo
Configuring MongoDB without a .conf File
Alternatively, many configuration options can be passed directly as flags to mongod via the Docker Compose command key. This gives you the flexibility to customize the container without needing to manage separate .conf files.
For example, if you want to initialize a replica set and limit the oplog size to 128MB, you simply include the values in the command key:
version: "3.7"

services:
  mongo:
    image: mongo:4.4.22
    command: 'mongod --oplogSize 128 --replSet rs0'
Please check the MongoDB Docker Hub page for a comprehensive list of configuration options.
Persisting MongoDB Data with GlusterFS
Containers are fast to deploy and make efficient use of system resources. However, their filesystems are ephemeral. If a container restarts, local data is lost.
To overcome this, we use GlusterFS. I previously set up a replicated GlusterFS volume to ensure data is mirrored across all nodes in the cluster.
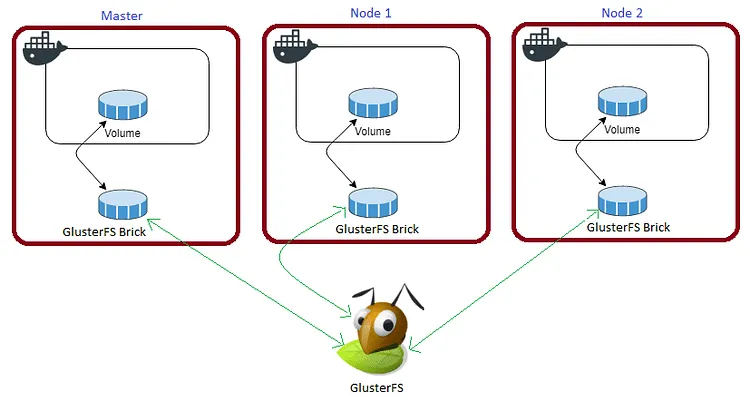
The volume is mounted across all nodes. When data is written to the
/mntpartition, it is instantly replicated.
If any node fails, the application automatically restarts on another node without losing data. This is the primary advantage of a replicated volume.
For disaster recovery, we need to persist the /data/db and /dump directories.
Create the necessary folders in the /mnt directory:
cd /mnt
sudo mkdir -p mongodb
sudo mkdir -p mongodump
Watch the video below for a complete guide on setting up a GlusterFS Replicated Volume.
Prepare the Deployment Environment
First, we will secure our deployment using Docker Secrets. Create a secret for the MongoDB root password:
echo "your_secure_password" | docker secret create mongodb_root_passwordNext, navigate to the /opt directory on your Swarm manager node and create the configuration directory for MongoDB:
cd /opt
sudo mkdir -p mongo
cd mongo
sudo touch mongo.yml
MongoDB Docker Compose Configuration
Open mongo.yml using your editor:
sudo nano mongo.ymlPaste the following Docker Compose configuration:
version: "3.7"

services:
  mongo:
    image: mongo:4.4.22
    volumes:
      - /mnt/mongodb:/data/db
      - /mnt/mongodump:/dump
    command: 'mongod --oplogSize 128 --replSet rs0'
    secrets:
      - mongodb_root_password
    environment:
      - MONGO_INITDB_ROOT_USERNAME=admin
      - MONGO_INITDB_ROOT_PASSWORD_FILE=/run/secrets/mongodb_root_password
    networks:
      - proxy
    deploy:
      placement:
        constraints: [node.role == manager]
      replicas: 1
      update_config:
        parallelism: 2
        delay: 10s
      restart_policy:
        condition: on-failure

secrets:
  mongodb_root_password:
    external: true

volumes:
  mongodb:
    driver: "local"
  mongodump:
    driver: "local"

networks:
  proxy:
    external: true
Deploy MongoDB using Docker Compose
Deploy the stack to your Swarm using the following command:
docker stack deploy --compose-file mongo.yml mongoIn Docker Swarm, whatever you deploy via compose is called a “stack,” and it contains multiple “services.”
Check the status of the deployment to ensure it scheduled properly:
docker stack ps mongoPrepare the MongoDB Replica Set Initialization
It is not a good idea to have both the primary MongoDB service and the Replica Set initialization script in the exact same configuration file. If we deploy both simultaneously, the replica set script might fail if the primary database isn’t fully booted. To prevent this, we deploy them separately.
Let’s prepare the environment to initialize the replica set.
cd /opt
sudo mkdir -p mongoinit
cd mongoinit
sudo touch mongoinit.yml
sudo nano mongoinit.yml
MongoDB Replica Set Docker Compose
Paste the following configuration into mongoinit.yml. This script will connect to your running mongo container, create the required database for Rocket.Chat, and initialize the replica set.
version: "3.7"

services:
  mongo-init-replica:
    image: mongo:4.4.22
    command: >
      mongo mongo/rocketchat --eval 'rs.initiate({ _id: "rs0", members: [ { _id: 0, host: "mongo:27017" } ]})'
    networks:
      - proxy
    deploy:
      placement:
        constraints: [node.role == manager]
      replicas: 1
      restart_policy:
        condition: none

networks:
  proxy:
    external: true
Deploy and Initiate the Replica Set
Deploy the initialization stack:
docker stack deploy --compose-file mongoinit.yml mongoinitCheck the status of the script to ensure it ran successfully:
docker stack ps mongoinit(Once it completes successfully, it will exit and not restart because we set condition: none)
Login to the MongoDB Docker Container
To verify everything is working, log directly into the database container.
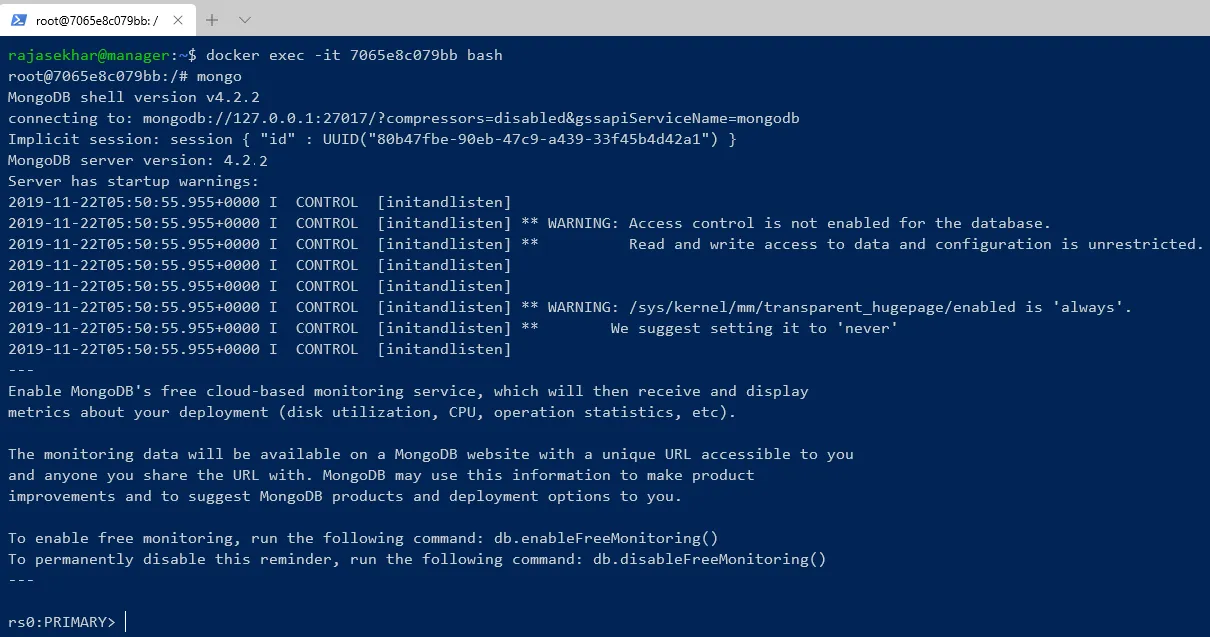
Type docker ps on your Swarm manager to list the running containers. Note down the CONTAINER ID of your MongoDB instance.
Log into the container’s interactive shell using that ID:
docker exec -it <CONTAINER_ID> bashOnce inside, open the Mongo shell:
mongo -u admin -pYou should see the rs0:PRIMARY> prompt, indicating that your replica set has been successfully initialized!
In the next post, I will deploy Rocket.Chat (Team Collaboration software) using this exact MongoDB infrastructure. Stay tuned! 🙂

Continue reading
How to Deploy Adminer 4.8.1 Database Management Tool in Docker Swarm Behind Traefik v2.0
Adminer is a lightweight database management tool with a clean GUI, serving as a powerful alternative to phpMyAdmin and CLI administration.

How to Deploy MariaDB 11.0.2 in Docker Swarm Behind Traefik v2.0
MariaDB turns data into structured information in a wide array of applications. Learn how to deploy this enhanced, drop-in replacement for MySQL in a Docker Swarm cluster.

How to Deploy MariaDB 11.2.2 Using Docker Compose Behind Caddy v2.7.6
MariaDB turns data into structured information in a wide array of applications, ranging from banking to websites. It is an enhanced, drop-in replacement for MySQL.