How to Setup Docker Swarm Cluster on Ubuntu 18.04 in Azure VPS
Docker Swarm is native clustering for Docker. It turns a pool of Docker hosts into a single, virtual host. Learn how to deploy a resilient cluster using GlusterFS for storage.

Docker Swarm provides native clustering for Docker. It turns a pool of Docker hosts into a single, virtual host. You continue to run the Docker commands you are used to, but now they are executed on a cluster by a swarm manager. The machines in a swarm can be physical or virtual; after joining, they are referred to as nodes.
If you have ever thought of setting up your own IT Infrastructure to host your required applications—such as a corporate website, blog, file server, mail server, team collaboration software, ERP, CRM, or a database server—with low costs and high availability, this post is for you. Let’s get started!
Introduction
In the past, setting up infrastructure was difficult because we had to host on physical devices. If something went wrong, it could take days to recover the applications running on them. There was always a risk of data loss without proper redundancy, making it an expensive and time-consuming process.
Today, in the Cloud Era, we can set up our own highly available IT infrastructure within hours using Virtual Machines in public or private clouds. You can even use a Raspberry Pi to host a Docker Swarm at home.
One of the most popular orchestration tools for this purpose is Docker Swarm. While there are other tools available (like Kubernetes), Docker Swarm is simple, easy to install, and integrates natively with the Docker ecosystem.
We can scale our Docker Swarm Cluster horizontally (by adding more nodes) or vertically (by scaling application replicas) in a matter of minutes.
To prevent data loss if a node goes down, we need persistent storage that replicates across the cluster. This ensures that the application can automatically restart on another node without impacting production.
I use GlusterFS as the persistent storage backbone for my Docker Swarm Cluster.
I am hosting all of my applications—such as WordPress, Docker Mail Server, Rocket.Chat, Nextcloud, Dolibarr ERP, Metabase, and Flarum—on a Docker Swarm Cluster, using MariaDB as the backend database server for all of them.
I use Traefik in front of all my applications as a Reverse Proxy and Load Balancer to expose them to the outside world securely. Check out my Traefik post to understand how to deploy it on a Docker Swarm Cluster.
If you want to use DigitalOcean to buy VPS servers to host your infrastructure, please consider using my referral link: https://m.do.co/c/4fc5bb284d41
Now, let’s dive into the actual setup.
Basics of Docker
What is Docker and a Container?
Docker is a Platform as a Service (PaaS) that uses OS-level virtualization to deliver software in packages called containers. A container is a standard unit of software; containers are isolated from one another and bundle their own software, libraries, and configuration files. All containers share a single operating system kernel, making them much more lightweight than traditional virtual machines.
The software that hosts the containers is called the Docker Engine, developed by Docker, Inc.
Basics of Docker Swarm
Docker Swarm turns a pool of Docker hosts into a single, virtual host. Commands are executed on the cluster by a swarm manager.
Swarm managers are the only machines in a swarm that can execute your commands or authorize other machines to join the swarm as workers.
Workers are there to provide capacity and do not have the authority to manage the swarm.
I am going to build 3 Ubuntu VMs (1 Manager and 2 Worker nodes) in Azure for this purpose.
Required Firewall Ports: You must open the following firewall ports on your Azure VMs for proper communication between the manager and worker nodes:
2376/tcp7946/tcpand7946/udp2377/tcp4789/udp80/tcpand443/tcp(used for exposing the web services to the outside world)
After building the VMs in Azure, SSH into them to proceed.
Prepare Ubuntu 18.04 VMs
First, add the GPG key for the official Docker repository to the system:
sudo curl -fsSL [https://download.docker.com/linux/ubuntu/gpg](https://download.docker.com/linux/ubuntu/gpg) | sudo apt-key add -Add the Docker repository to your APT sources:
sudo add-apt-repository "deb [arch=amd64] [https://download.docker.com/linux/ubuntu](https://download.docker.com/linux/ubuntu) $(lsb_release -cs) stable"Next, update the package database with the Docker packages from the newly added repo:
sudo apt-get updateInstall Docker
Run the following command on all the VMs to install Docker CE (Community Edition):
sudo apt-get install -y docker-ceDocker should now be installed, the daemon started, and the process enabled to start on boot. Check the version using the following command:
docker -v
You can check the status by running:
sudo systemctl status dockerInstall Docker Compose
Now it’s time to install Docker Compose on the VMs.
Check the current release and, if necessary, update the version number in the command below.
sudo curl -L "[https://github.com/docker/compose/releases/download/1.28.5/docker-compose-$(uname](https://github.com/docker/compose/releases/download/1.28.5/docker-compose-$(uname) -s)-$(uname -m)" -o /usr/local/bin/docker-composeNext, set the executable permissions for Docker Compose:
sudo chmod +x /usr/local/bin/docker-composeVerify the installation was successful:
docker-compose -v
Initialize Docker Swarm
Now it’s time to initiate our Docker Swarm cluster. Run this command only on the manager node:
docker swarm initThe above command configures the node as a Swarm Manager. You will see an output similar to this:
Swarm initialized: current node (85s5e41x55jyx3oflte9qdo5p) is now a manager.

To add a worker to this swarm, run the following command:

docker swarm join --token SWMTKN-1-0eith07xkc... 10.0.0.4:2377
If your VM has multiple network interfaces, you must specify the advertise IP using:
docker swarm init --advertise-addr <YOUR_IP_ADDRESS>
Run the docker swarm join command you received from the initialization output on both worker nodes to join them to the cluster.
From the manager node, verify that all nodes have checked in successfully:
docker node ls
Watch the video below for a visual guide on setting up the Docker Swarm Cluster on Ubuntu.
Install GlusterFS
Now it’s time to install a Replicated GlusterFS Volume on the swarm cluster for persistent data storage.
Required GlusterFS Firewall Ports: You must open these ports in Azure for GlusterFS to replicate across the nodes.
24007/tcp(Gluster Daemon)24008/tcp(Management)49152/tcpand up (Each brick requires its own port starting from 49152)111/tcpand111/udp(portmapper)
Install the software properties common package:
sudo apt-get install software-properties-commonAdd the community GlusterFS PPA and update your sources:
sudo add-apt-repository ppa:gluster/glusterfs-7
sudo apt-get update
Install the GlusterFS Server on all nodes:
sudo apt-get install glusterfs-serverStart and enable the glusterd service:
sudo systemctl start glusterd
sudo systemctl enable glusterd
Configure the GlusterFS Cluster
From the manager node, probe your worker nodes to link the cluster:
sudo gluster peer probe node1
sudo gluster peer probe node2
(Replace node1 and node2 with the actual hostnames or IP addresses of your workers).
Verify the storage pool list:
sudo gluster pool list
Create the directory where GlusterFS will store the brick data. Run this command on all the nodes:
sudo mkdir -p /gluster/brickCreate the GlusterFS replicated volume from the manager node:
sudo gluster volume create swarm-gfs replica 3 manager:/gluster/brick node1:/gluster/brick node2:/gluster/brick force(Replace manager, node1, and node2 with your actual VM hostnames).
You will see the following output:
volume create: swarm-gfs: success: please start the volume to access data
Start the volume:
sudo gluster volume start swarm-gfsVerify the health and status of the replicated volume:
sudo gluster volume info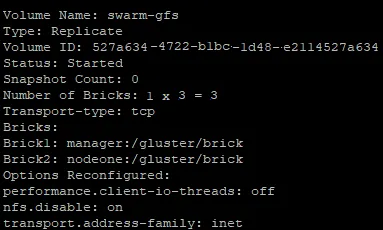
Mount the Persistent Storage
Finally, we need to mount the GlusterFS replicated volume on each Node so Docker containers can access it at /mnt. Run the following commands on all nodes:
sudo umount /mnt || true
echo 'localhost:/swarm-gfs /mnt glusterfs defaults,_netdev,backupvolfile-server=localhost 0 0' | sudo tee -a /etc/fstab
sudo mount -a
sudo chown -R $USER:docker /mnt
How this works: The volume is mounted across all nodes at
/mnt. When a Docker container writes a file to the/mntpartition, GlusterFS instantly replicates that data to all the other nodes in the cluster.
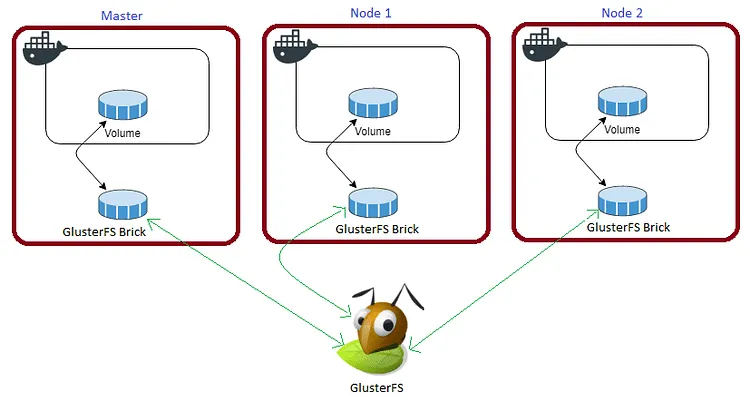
Watch the video below for a complete guide on setting up a GlusterFS Replicated Volume.
In the upcoming posts, I will show you how to run stacks and services on this Swarm Cluster with a reverse proxy (Traefik) and automatic Let’s Encrypt SSL enabled by default.
Stay tuned! 🙂

Continue reading

How to Deploy Flarum 1.8.1 - Open Source Forum in Docker Swarm Behind Traefik v2.0
Flarum is the next-generation forum software that makes online discussion fun. It is delightfully simple, lightning-fast, and highly extensible.

How to Deploy Highly Available WordPress in Docker Swarm Behind Traefik v2.0
WordPress is a powerful Content Management System (CMS) based on PHP and MySQL. Learn how to deploy a highly available instance in a Docker Swarm cluster using Traefik.

How to Setup Hugo 0.8.0 Extended Dev Environment on Windows 10
Hugo is a static site generator written in Go. With its amazing speed and flexibility, Hugo makes building websites fun and incredibly fast.