How to Deploy Jekyll 4.2.0 in Docker Swarm Behind Traefik v2.0
Jekyll is a highly customizable static site generator. Transform plain text written in your favorite markup language into beautiful, static websites.

Jekyll is a static site generator. You give it text written in your favorite markup language, and it uses layouts to create a static website. You can tweak how you want the site URLs to look, what data gets displayed on the site, and much more.
In this post, I am going to show you how to deploy Jekyll 4.2.0 to our Docker Swarm Cluster using Docker Compose.
Jekyll is a simple, blog-aware static site generator for personal, project, or organizational sites. Written in Ruby by Tom Preston-Werner, GitHub’s co-founder, it is distributed under the open-source MIT license.
The Story Behind How I Learned Jekyll
It is quite an interesting story. One day, I was searching for Single Sign-On (SSO) solutions for a Docker Swarm Cluster integrated with Traefik.
I discovered Authelia and Keycloak for this purpose. When I opened the Authelia documentation site, I was immediately impressed. It looked simple, clean, and highly readable. Out of curiosity, I looked into the underlying architecture and found it was built using Just the Docs, a popular Jekyll theme.
That discovery sparked my journey into learning Jekyll, Ruby, and RubyGems (the software package manager required to build Jekyll sites).
Prerequisites
Please ensure you fulfill the following requirements before proceeding with the deployment:
- A Docker Swarm Cluster configured with GlusterFS for persistent storage.
- Traefik v2.0 deployed as the ingress reverse proxy to expose microservices externally.
- A deployed Database stack (though Jekyll itself is static and does not require a database, this is part of our standard cluster setup).
Introduction
If you are looking for a tool to generate a fast website using your raw data and templates, Jekyll is a first-class citizen.
A static website is pre-rendered; this means all the files (HTML, CSS, JavaScript, and images) exist on the server as-is and do not need to be dynamically processed on the backend like CMS platforms (WordPress, Joomla, Drupal).
No more databases, comment moderation, or pesky updates to install—just your content.
Jekyll uses Markdown, Liquid, HTML, and CSS to generate static sites that are instantly ready for deployment. It is inherently blog-aware, meaning permalinks, categories, pages, posts, and custom layouts are natively supported.
Why Choose Jekyll?
Instead of relying on databases, Jekyll takes raw content, renders Markdown or Textile files through Liquid templates, and produces a complete, static website ready to be served by web servers like Caddy, Apache, or Nginx.
Jekyll is the engine behind GitHub Pages, a feature that allows users to host websites based directly on their GitHub repositories at no additional cost.
Jekyll is incredibly flexible and pairs perfectly with front-end frameworks such as Bootstrap or Tailwind CSS. Jekyll sites can also be connected to cloud-based Git CMS software such as CloudCannon, Forestry, Netlify CMS, or Siteleaf, enabling content editors to modify site content without touching any code.
Core Features
Jekyll is not magic. It is designed so users can understand the underlying build processes without excessive reading. It does exactly what you ask it to do and nothing more.
- No Database: Jekyll doesn’t use a database. All posts and pages are compiled into static HTML prior to publication.
- Lightning Fast: Jekyll is fast because you are serving plain static pages, resulting in fewer HTTP requests and zero database latency.
- Content is King: Jekyll focuses on content first and foremost, making the publishing process highly enjoyable.
- Stability: If your site builds today, it will build tomorrow. Backward compatibility is a core philosophy.
- Small & Extensible: The core includes only what 90% of users need. Everything else can be added via plugins using extensible APIs.
Persisting Jekyll Data with GlusterFS
While containers make efficient use of system resources, their filesystems are ephemeral. If a container restarts, all local modifications are lost.
To overcome this, we use GlusterFS. I previously set up a replicated GlusterFS volume to ensure our data is mirrored across all nodes in the cluster.
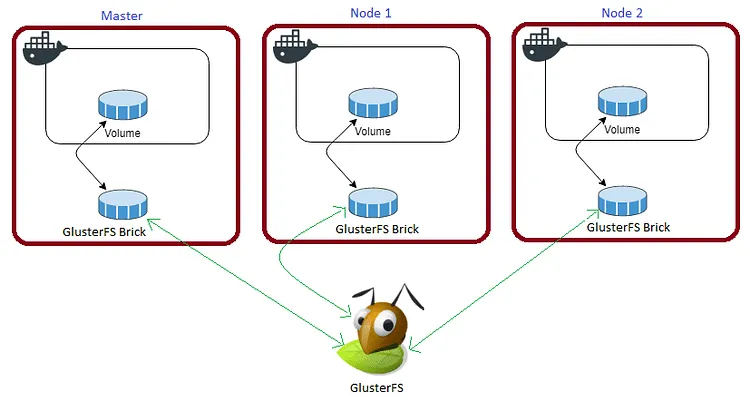
The volume is mounted across all nodes. When data is written to the
/mntpartition, it is instantly replicated.
If a node fails, Docker Swarm automatically restarts the application on another node without losing data. This is the beauty of a replicated volume.
For disaster recovery and persistence, we need to persist the /srv/jekyll directory where our site source code lives.
Create a folder in the /mnt directory for the persistent Jekyll data:
cd /mnt
sudo mkdir -p jekyll
Watch the video below for a complete guide on setting up a GlusterFS Replicated Volume.
Prepare the Deployment Environment
We will use Docker Compose to define the deployment environment.
Navigate to the /opt directory on your Swarm manager node and create the configuration directory for Jekyll:
cd /opt
sudo mkdir -p jekyll
cd jekyll
sudo touch jekyll.yml
Jekyll Docker Compose Configuration
Open jekyll.yml using your editor:
sudo nano jekyll.ymlPaste the following Docker Compose configuration. Notice that we are mapping our persistent GlusterFS mount to the /srv/jekyll directory inside the container.
version: "3.7"

services:
  jekyll:
    image: jekyll/jekyll:latest
    command: jekyll serve --watch --force_polling --verbose
    volumes:
      - /mnt/jekyll:/srv/jekyll
    environment:
      - JEKYLL_ENV=production
    networks:
      - proxy
    ports:
      - "4000:4000"
    deploy:
      placement:
        constraints: [node.role == worker]
      replicas: 1
      update_config:
        parallelism: 2
        delay: 10s
      restart_policy:
        condition: on-failure
      labels:
        - "traefik.enable=true"
        - "traefik.docker.network=proxy"
        - "traefik.http.routers.jekyll.rule=Host(`jekyll.example.com`)"
        - "traefik.http.routers.jekyll.tls=true"
        - "traefik.http.routers.jekyll.tls.certresolver=default"
        - "traefik.http.routers.jekyll.entrypoints=websecure"
        - "traefik.http.services.jekyll.loadbalancer.server.port=4000"

volumes:
  jekyll:
    driver: "local"

networks:
  proxy:
    external: true
Deploy Jekyll to Docker Swarm
Deploy the stack to your Swarm using the following command:
docker stack deploy --compose-file jekyll.yml jekyllCheck the status of the deployment:
docker stack ps jekyllWhen we deploy Jekyll to Docker Swarm, it expects a project structure in
/srv/jekyll(which maps to our local/mnt/jekylldirectory). We need to initialize this structure manually the first time.
Initializing the Jekyll Site
We have to run a few commands inside the Jekyll Docker container to scaffold the initial folder structure and serve our site.
First, locate your worker node (since we constrained the deployment to node.role == worker). SSH into the worker node and run docker ps to find the Jekyll container ID.
Log into the Jekyll Docker container using the following command:
docker exec -it <jekyll_container_id> bashInside the container, run the following command to generate a Gemfile for the static site:
bundle initNow, edit the generated Gemfile to include your site details (the theme you are going to use and required plugins).
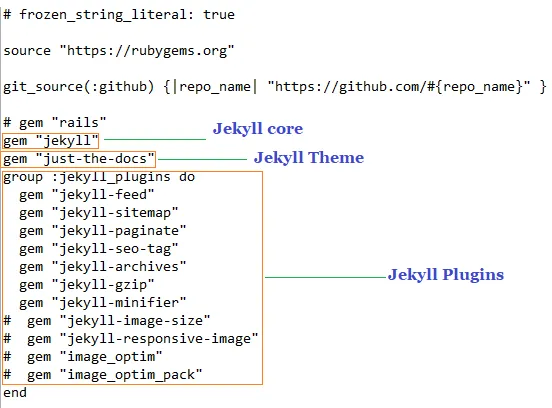
You also need to create and edit the _config.yml file to include your site name, theme name, and basic metadata.
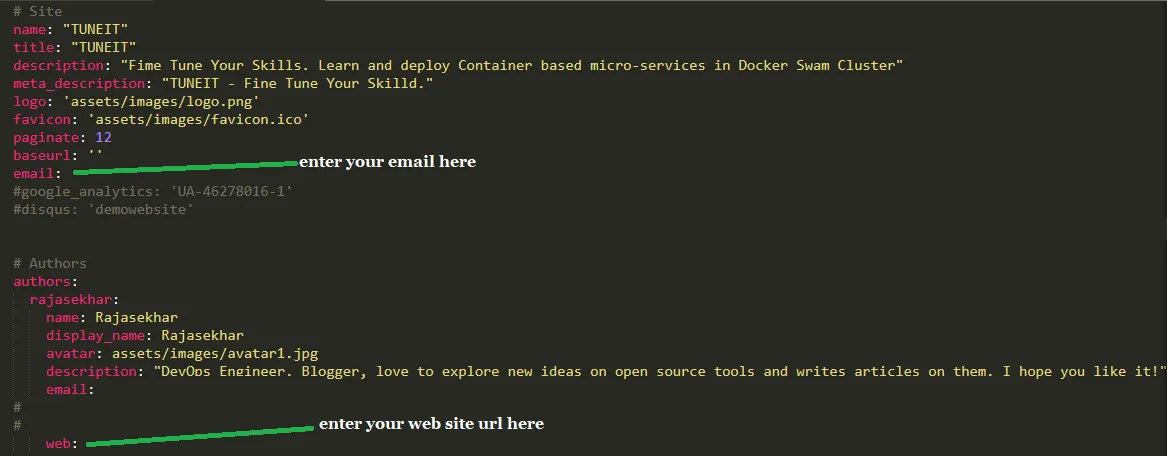
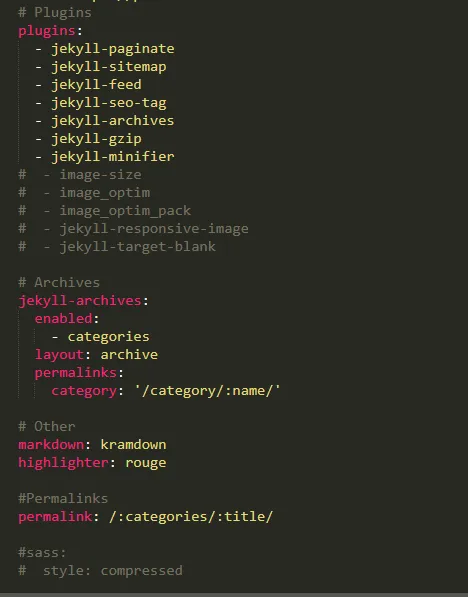
The
Gemfileand_config.ymlfiles are the heart of any Jekyll site. You must specify your theme, plugins, and configuration options here.
Install your dependencies and build the site using the following command:
bundle install
bundle exec jekyll build
This command creates the folder structure based on the selected theme and generates a Gemfile.lock. In the future, if you add more plugins, you simply run bundle install followed by a fresh build.
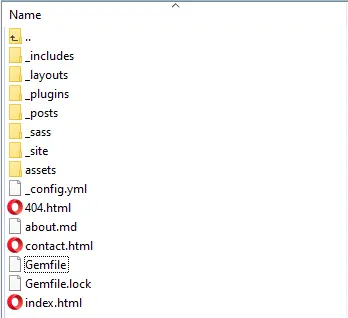
Now, trigger the server to start watching and serving the site:
bundle exec jekyll serveIf you use Jekyll for a personal blog, simply place your markdown (
.md) articles in the_postsfolder, and the server will automatically detect and rebuild them.
Access Your Site
Open any browser and type https://jekyll.example.com (ensure you replace example.com with your actual domain name).
Ensure you have configured a DNS A-Record or CNAME pointing jekyll.example.com to your Swarm ingress load balancer.
If you followed along and configured the Just the Docs theme in your _config.yml, you will be greeted with a clean documentation site layout.

I have experimented with a lot of static site generators, but I found Jekyll to be incredibly easy to learn and deploy, especially in a containerized Swarm environment.
If you enjoyed this tutorial, please share your thoughts by commenting below! It helps me bring more open-source self-hosting articles to the blog.
Stay tuned for more deployments in upcoming posts!

Continue reading

How to Deploy Metabase 0.46.5 in Docker Swarm Behind Traefik v2.10.1
Metabase is the easy, open-source way for everyone in your company to ask questions and learn from data without knowing SQL. Learn how to deploy it in a Docker Swarm cluster.

How to Setup Jekyll 4.2.0 Dev Environment on Windows 10
While Windows is not an officially supported platform for Jekyll, you can run it perfectly with the right tweaks. Learn how to set up a Jekyll dev environment using RubyInstaller.

How to Deploy ProjectSend r1070 in Docker Swarm Behind Traefik v2.0
ProjectSend is a free, secure, and user-friendly file-sharing software. Learn how to self-host this client-oriented tool in a Docker Swarm cluster.